Electronics & Coding
Reflections
This week we started Digital Prototyping. I am very excited to learn about this topic to be able to implement it to my future projects. We started with basic electronics. I do not have any background in electronics so starting it is a little overwelming.
Basic Electronics
We had a theoretical introduction to have a general idea of all the elements that constitute an electronic circuit.
Microcontroller MCU Arduino Components — board (hardware) — digital interface (software) — community (collaboration, opensource) Milis — time
SBCs — single board computer Raspberry Pi
Adafruit
Opensource — share a like, if you do a modification you are forced to share it IP — Intelectual Property Permissives IP licenses
First Assignment
Make some music with the board and a simple buzzer
Tones Code
const int buzzer = 23; //buzzer to arduino pin 23

void setup(){
  pinMode(buzzer, OUTPUT); // Set buzzer - pin 23 as an output
}

void loop(){
  tone(buzzer, 1000); // Send 1KHz sound signal...
  delay(1000);        // ...for 1 sec
  noTone(buzzer);     // Stop sound...
  delay(750);        // ...for 1sec
  tone(buzzer, 500); // Send 1KHz sound signal...
  delay(1000);        // ...for 1 sec
  noTone(buzzer);     // Stop sound...
  delay(500);        // ...for 1sec
  tone(buzzer, 200); // Send 1KHz sound signal...
  delay(1000);        // ...for 1 sec
  noTone(buzzer);     // Stop sound...
  delay(100);        // ...for 1sec
  tone(buzzer, 500); // Send 1KHz sound signal...
  delay(600);        // ...for 1 sec
  noTone(buzzer);     // Stop sound...
  delay(1000);        // ...for 1sec
}
Video of the Buzzer playing different Tones
Inputs & Outputs
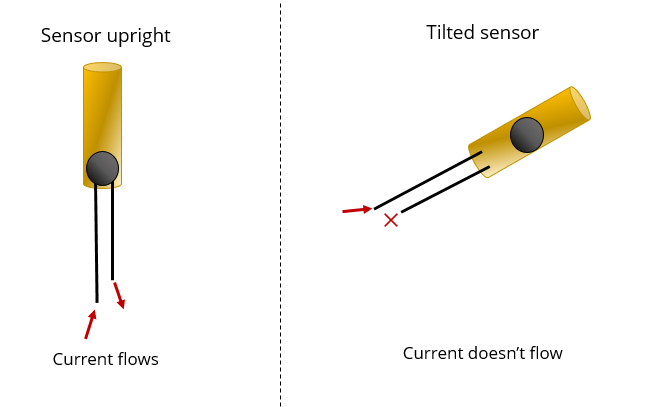
This topic, as well as the introduction of electronics, proved challenging for me to work with and learn the concepts. During the first part of the class, we had an introduction to a lot of different types of sensors. I discovered the large range of possibilities, and I didn’t believe that you could gain information with that many different techniques. One of the things that I found most interesting has been the simplicity of the mechanisms that use the sensors. The tilt sensor, for example, detects an object’s rotation degrees only through a small sphere inside a tube that closes or not depending on the inclination.

Second Assignment
Building an Optical Telegraph
Use a sensor and and actuator to comunicate.
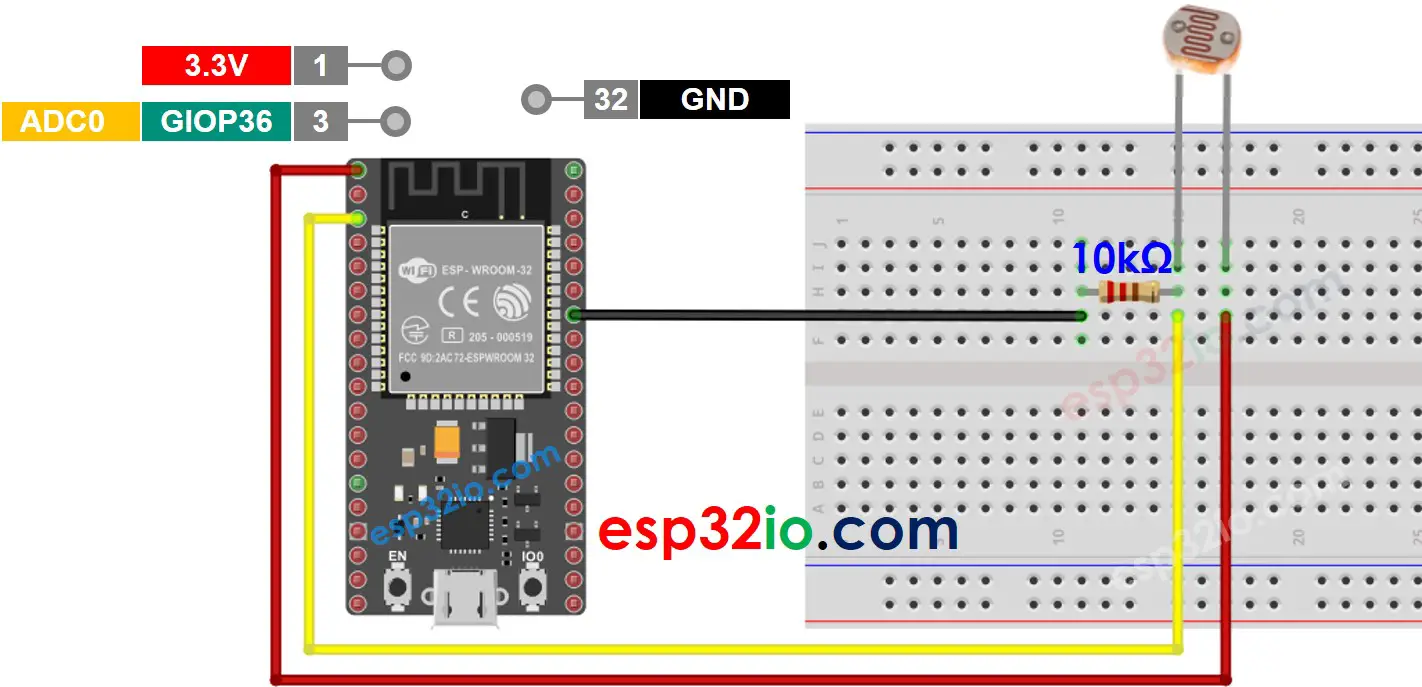
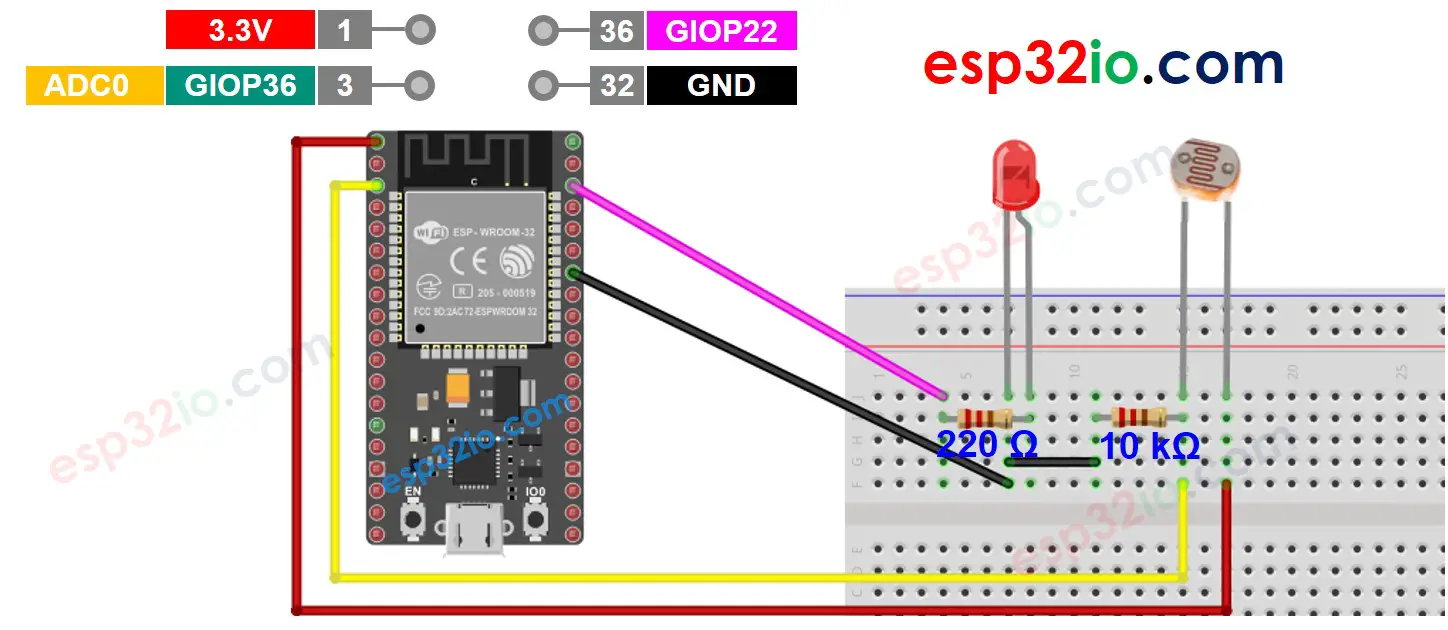
Use a simple Light Dependant Resistor (LDR) to know the light level of the enviroment, or the area we point our LDR. If we pair our LDR with a LED it’s easy to know if the led is ON or OFF, that’s an optical Telegraph. - First test, use morse code to transmith data from the LED side to the LDR side.
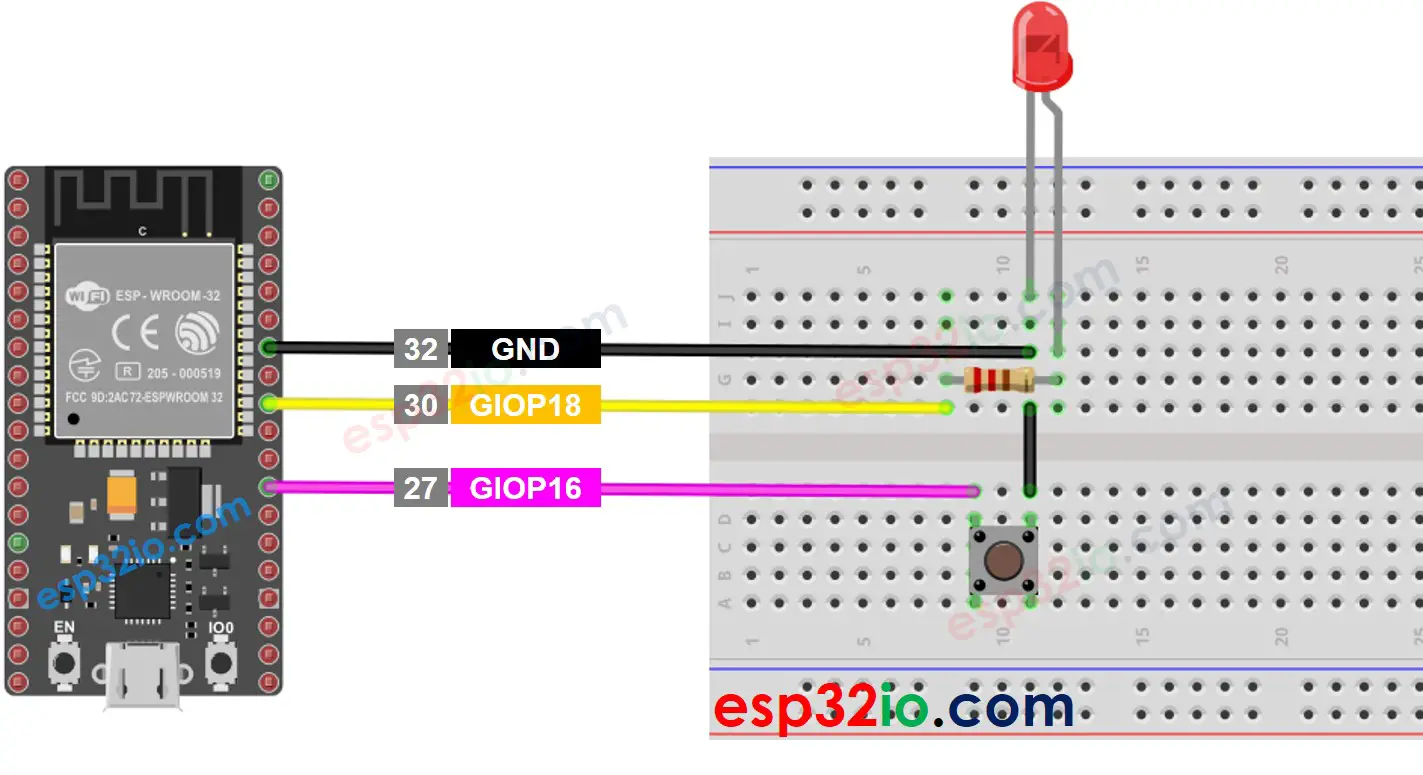
First of all i investigated how to turn on a LED through a switch.

Code to control a LED
#define BUTTON_PIN 16  // ESP32 pin GIOP16, which connected to button
#define LED_PIN    18  // ESP32 pin GIOP18, which connected to led

// variables will change:
int led_state = LOW;    // the current state of LED
int button_state;       // the current state of button
int last_button_state;  // the previous state of button

void setup() {
  Serial.begin(9600);                // initialize serial
  pinMode(BUTTON_PIN, INPUT_PULLUP); // set ESP32 pin to input pull-up mode
  pinMode(LED_PIN, OUTPUT);          // set ESP32 pin to output mode

  button_state = digitalRead(BUTTON_PIN);
}

void loop() {
  last_button_state = button_state;      // save the last state
  button_state = digitalRead(BUTTON_PIN); // read new state

  if (last_button_state == HIGH && button_state == LOW) {
    Serial.println("The button is pressed");

    // toggle state of LED
    led_state = !led_state;

    // control LED arccoding to the toggled state
    digitalWrite(LED_PIN, led_state);
  }
}
Light Sensor

Light Sensor and LED

// constants won't change
#define LIGHT_SENSOR_PIN  36  // ESP32 pin GIOP36 (ADC0) connected to light sensor
#define LED_PIN           22  // ESP32 pin GIOP22 connected to LED
#define ANALOG_THRESHOLD  500

void setup() {
  pinMode(LED_PIN, OUTPUT); // set ESP32 pin to output mode
}

void loop() {
  int analogValue = analogRead(LIGHT_SENSOR_PIN); // read the value on analog pin

  if (analogValue < ANALOG_THRESHOLD)
    digitalWrite(LED_PIN, HIGH); // turn on LED
  else
    digitalWrite(LED_PIN, LOW);  // turn off LED
}